Search This Blog

Sunday, January 30, 2011

Glazed Poppy Seed Bread

Glazed Poppy Seed Bread
*****
I do believe I got this recipe from my beautiful sister-in-law, but I cannot be 100% sure. If you don't like it too sweet, don't add the glaze, it's still great!
INGREDIENTS:
3 c. all-purpose flour
1 1/2 tsp. salt
1 1/2 tsp. baking powder
3 Tbsp. poppy seeds
1 1/2 tsp. butter flavored extract
1 1/3 c. vegetable oil
3 eggs
1 1/2 c. milk
2 1/4 c. white sugar
1 1/2 tsp. vanilla extract
1 1/2 tsp. almond extract

DIRECTIONS:
1. Preheat oven to 350*. Grease pans well (bottoms especially.) (I do 6 mini loaves - I'm a bake-giver, you could also do 2 9" loaves, but make sure you bake for appropriate times.)

2. Mix flour, salt, baking powder, poppy seeds, butter favoring, oil, eggs, milk, sugar, vanilla, and almond flavoring. Pour into prepared pans.

3. Bake at 350* for 30-35 min. (1 hr for 2 large loaves.) Cool 5 min. Pour glaze over top.
GLAZE:
INGREDIENTS:

1/4 c. milk
1/2 tsp. butter flavored extract
1/2 tsp. almond extract
1 tsp. vanilla extract
approx 2 c. powdered sugar
To make glaze: Mix first 4 ingredients. Then add enough powdered sugar to make a glaze. Pour over loaves. (As it sits, the glaze will harden, don't make it too runny or too thick.)
ENJOY!

signature

Saturday, January 29, 2011

Salsa Chicken


Salsa Chicken
*****

I don't know if you can really even call this a recipe, but I wanted to share it, since it's one of Matthew's favorite and it so easy!


INGREDIENTS:
chicken tenders
salsa
cheddar cheese slices

DIRECTIONS:

1. Preheat oven to 350*.
2. In a greased pan, I usually use 8x8 but depends on how much chicken you're doing. Usually between 6-8 tenders thawed (I've used frozen too, closer to 30 min for frozen) chicken for my family.
3. Pour salsa over the top. I usually use a whole pint jar of homemade salsa.
4. Put in the preheated oven until chicken is cooked, about 15-20 (for thawed) or 25-30 min (for frozen). depending on the size and amount of your chicken. Test with meat thermometer to make sure chicken is cooked. It will be slightly pink even when cooked because of the salsa, but don't over cook.
5. After cooked, remove from the oven and top with sliced cheese immediately so cheese melts over chicken.

**This is super great on the grill too! Marinate the chicken in salsa for a few hours before grilling then top with cheese before removing from grill to melt cheese!**

This is naturally GLUTEN FREE! :)

ENJOY!

signature

Chocolate Scotcheroos


Chocolate Scotcheroos
*****
Who doesn't love a peanut butter krispy treat with chocolate and butterscotch topping?! If you use gluten free krispies (which taste the same as rice krispy brand) these are gluten free! :) One of our favorites

INGREDIENTS:
1 c. light corn syrup
1 c. sugar
1 c. peanut butter
6 c. rice krispies
1 c. semi-sweet chocolate chips
1 c. butterscotch chips

DIRECTIONS:
1. Place corn syrup and sugar into large saucepan. Cook over medium heat, stirring frequently until sugar dissolves and mixture begins to boil.

2. Remove from heat. Stir in peanut butter, mix well.
3. Add rice krispies. Stir until well coated.
4. Press mixture into well greased 13x9x2" pan. Set aside.
5. Melt chocolate and butterscotch chips together in small saucepan over low heat, stirring constantly.
6. Spread evenly over cereal mixture. Let stand until firm. Cut into 2x1" bars when cooled.
Remember to use Gluten Free Krispies for GLUTEN FREE!

ENJOY!

signature

Jalapeno Poppers


Jalapeno Poppers
*****
These are classic poppers, they are easy and versatile!

INGREDIENTS:
12 oz. cream cheese, soft
8 oz. shredded cheddar cheese
1 Tbsp. bacon bits (optional)
12 oz. jalapeno peppers, seeded and halved
(I've used larger peppers for the kids, less spicy, shown in picture above, hubby loves the classic spicy jalapeno)
1 c. milk
1 c. all-purpose flour
1 c. dry bread crumbs (I've used crushed ritz crackers in a pinch too)
2 qts oil for frying

DIRECTIONS:
1. In medium bowl, mix cream cheese, cheddar cheese and bacon bits. Spoon this mix into pepper halves.
2. Put milk and flour into 2 separate small bowls. Dip stuffed jalapenos first into milk then into flour, making sure well coated with each. Allow the coated jalapenos to dry for 10 min.
3. Dip jalapenos in milk again and roll them through the breadcrumbs. Allow them to dry, then repeat to ensure the entire surface of the jalapeno is coated (I pat the crumbs with my fingers in ensure covering.)
4. Heat deep fryer to 365*. Deep fry the coated jalapenos 2-3 min each, until golden brown. Remove and let drain on a paper towel.

**Make sure to use gloves when handling hot peppers! And beware of hot oil IT BURNS!**

ENJOY!

signature

Classic Chocolate Whoopie Pie

CLASSIC CHOCOLATE WHOOPIE PIES
*****
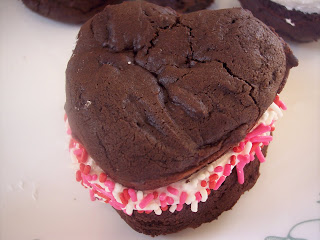
Don't confuse these for moon pies. These are soft cakes filled with creamy frosting. Like oreo cakesters.... but better of course cause they're homemade!

INGREDIENTS:
1 2/3 c. flour
2/3 c. unsweetened cocoa powder
1 1/2 tsp. baking soda
1/2 tsp. salt
4 Tbsp. butter, softened
4 Tbsp. shortening
1 c. packed dark brown sugar (I used light brown)
1 large egg
1 tsp. vanilla extract
1 c. milk

DIRECTIONS:
1. Preheat oven to 375*.
2. Mix together flour, cocoa powder, baking soda, and salt. Beat together butter, shortening, brown sugar on low speed in stand mixer with paddle attachment. Increase speed to medium and beta until fluffy and smooth, about 3 min. Add egg an vanilla and beat another 2 min.
3. Add half flour mixture and half milk to batter and beat on low until just incorporated. Add remaining flour mixture and 1/2 c. milk and beat until completely combined.
4. Using spoon, drop about 1 Tbsp. batter onto baking sheet lined with parchment paper and repeat, spacing them at least 2" apart. (I used a heart shaped pan and a muffin top pan, mine are thicker than if you follow 1 Tbsp. directions.)
5. Bake one sheet at a time for about 10 min. or until pies spring back when pressed gently. Remove from oven and let cakes cool on sheet for 5 min before transferring them to a rack to cool completely.

When completely cool. Top the bottom of one cake with frosting, then top with another to make a sandwich.

CLASSIC MARSHMALLOW FILLING

INGREDIENTS:
1 1/2 c. marshmallow fluff (or cream)
1 1/4 c. shortening
1 c. powdered sugar
1 Tbsp. vanilla extract

DIRECTIONS:
1. In work bowl with paddle attachment, beat together the fluff and shortening. Start on low and increase to medium until mixture is smooth and fluffy, about 3 min.
2. Reduce mixer speed to low, add sugar and vanilla and beat until incorporated. Increase mixer speed to medium and beat until fluffy, 3 min. more.


I enjoyed using a heart pan and rolling the sides in sprinkles!


Hubby had to have a GIANT whoopie!

**These are best eaten the day they are made. The cakes will stick together if stacked. Store in single layers, or with wax paper in between. Store in airtight container 3 days. You can freeze these pies for up to a month. Best to individually wrap and freeze pies. Freeze 1 hr on cookie sheet, then place into small resealable bags. Zip the bag 3/4 way closed, suck the air out through the open seam and return to freezer**


ENJOY!


signature

Basic Raised Doughnuts & Chocolate Glaze Recipe

Basic Raised Doughnuts
*****
Who can resist classic raised doughnuts? Make the dough the night before, for quicker doughnuts in the morning.

INGREDIENTS:
3 Tbsp. active dry yeast, divided (high alt folks remember to adjust this!)
1 c. whole milk, heated to 110*, divided
2 - 2 1/2 c. bread flour, divided
2 Tbsp. sugar
1/2 tsp. salt
1 tsp. vanilla extract
3 egg yolks
1/4 c. shortening
oil for frying

DIRECTIONS:
1. In medium bowl, dissolve 2 Tbsp. yeast into 3/4 c. milk. Add 3/4 c. flour and stir to create smooth paste. Cover and let rest in a warm spot for 30 min.
2. Combine the remaining milk and yeast in the bowl (if you have a mixer with paddle attachment.) Add the rested flour mixture along with sugar, salt, vanilla and egg yolks. Mix until smooth. Turn off the mixer and add 1/2 c. remaining flour. Mix on low for about 30 seconds. Add the butter and mix until it becomes incorporated, about 30 seconds. Switch to dough hook and add more flour, 1/4 c at a time until dough pulls completely away from the sides of the bowl and is smooth and not too sticky. (You still want it soft and moist, too much flour and your doughnuts will be hard and flour-y YUCK). Cover the bowl with plastic wrap and refrigerate at least 1 hour (up to 12 hours).

3. Roll out dough on lightly floured surface to 1/2" thick. With doughnut or cookie cutter, cut out 3" diameter rounds with 1" holes.

4. Place the doughnuts on baking sheet 1" apart and cover with plastic wrap. Let sit in warm spot to rise until they almost double in size (5-20 min).
5. While doughnuts are rising, heat deep fryer to 360*. Place doughnuts in oil, a couple at a time, frying 1-2 min per side or until light brown (Mine took less than this). Remove, drain and let cool slightly before glazing. Repeat with doughnut holes (less time.)

6. Glaze with chocolate glaze or coat in sugar.
(I glazed my doughnuts with the recipe that follows and then put my doughnut holes in a large resealable plastic bag and shook with granulated sugar.


CHOCOLATE GLAZE

INGREDIENTS:

1 1/2 c. powdered sugar
4 Tbsp. cocoa powder
2 Tbsp. milk
2 tsp. vanilla

1. Sift together the sugar and cocoa powder in a medium bowl. Slowly stir in the milk and vanilla, a little at a time, to make a smooth, pourable glaze.

(I dipped my doughnuts upside down in glaze, twisting slightly to coat the top.)

ENJOY!


signature

Wednesday, January 19, 2011

Gluten Free Homemade Macaroni & Cheese


Gluten Free Homemade Macaroni & Cheese

*****
My hubby and I ate half of the gluten free version and it was delicious!

INGREDIENTS:
8 oz gluten free elbow macaroni
4 Tbsp. butter
2 Tbsp. cornstarch
2 c. milk
8 oz grated cheddar cheese
pinch of salt and pepper

DIRECTIONS:
1. Cook macaroni according to directions.
2. In saucepan, melt butter, then whisk in cornstarch to make a "roux."
3. Cook for a few minutes.
4. Slowly whisk milk into roux. Whisk out any lumps, until all combined.
5. Add cheese and whisk until creamy and melted. Season with salt and pepper.
6. When cheese is all melted. Add noodles and mix until well coated.

ENJOY!! ;)


signature

Homemade Macaroni and Cheese


Homemade Macaroni & Cheese
*****
A basic homemade macaroni and cheese recipe. I quick fix that is almost as quick as the box kind and SO much better for you and so much better tasting!

INGREDIENTS:
8 oz elbow macaroni
4 Tbsp. butter
4 Tbsp. flour
2 c. milk
8oz. cheddar cheese, grated
pinch of salt and pepper

DIRECTIONS:

1. Cook Macaroni according to directions.

2. In a pot over medium heat, melt the butter to form a roux. Cook for a few minutes on medium heat.

3. Slowly whisk milk into roux. Whisk out any lumps.

4. Add grated cheese and season with salt and pepper

5. Once cheese is melted add noodles and stir until combined.


**THIS RECIPE WAS FOUND AT macheesmo.com He's got an amazing cooking blog! That's where I found my recipe for homemade cool ranch doritos too! ;)**


ENJOY! ;)

signature

Chicken Puffs


Chicken Puffs
******
This one got another 6 stars out of hubby. You can make your own homemade crescent roll dough, or you can buy the kind in a tube for a quick dinner.

INGREDIENTS:
6 chicken tenders
olive oil
pepper
1/2 onion, chopped
4 cloves garlic, minced
6 oz cream cheese (3/4 of 8oz pkg)
6 Tbsp. butter
4 (8oz) cans crescent roll dough

1. In medium pan, saute chicken over medium heat in olive oil until no longer pink. Season with pepper.
2. Remove chicken and chop into small bites.
3. Add onion and garlic to oil in pan and saute, add chicken and cook until onions are tender.
4. In medium bowl, blend hot chicken mixture, cream cheese and butter until creamy.
5. Preheat oven to 325*
6. Unroll croissants, place 1/2 Tbsp. (or less) on each triangle. Roll up.
(You can also use 2 triangles, add 1 Tbsp. mixture and fold up sides into balls.)
7. Arrange on large baking sheet (I used stoneware).
8. Bake in preheated oven 12 min. or until golden brown.


**TO MAKE THIS GLUTEN FREE FOR HAILEY, I SERVED IT ON TOASTED GLUTEN FREE BREAD!**

ENJOY! ;)


signature

Blueberry & Cream Cheese Muffin Tops


Blueberry & Cream Cheese Muffin Tops
*****
These are SOO yummy! My muffin top pan is pretty big, I'd watch the time if yours is smaller. I omitted the lemon rind in the muffin and topping for two reasons; I didn't have any on hand, and I don't like lemons ;)

INGREDIENTS:
1 1/4 c. sugar
1/2 c. butter (soft)
2 eggs
2 1/4 c. flour
1 tsp. baking powder
1 tsp. salt
3/4 c. milk
1/4 c. water
2 c. blueberries (fresh or frozen, thawed and drained)
1 pkg. (8oz) cream cheese
(1 tsp. grated lemon rind)

CRUMB TOPPING:
1/4 c. sugar
1/4 c. flour
(1 tsp. grated lemon rind)
2 Tbsp. margarine

DIRECTIONS:
1. For crumb topping: combine sugar, flour (and lemon rind), cut margarine into mixture until it resembles coarse crumbs.
2. For muffins: Cream sugar and margarine until light and fluffy.
3. Add eggs, one at a time, mixing well.
4. Combine 2 cups flour, baking powder and salt.
5. Add to creamed mixture alternately with milk and water.
6. Add cream cheese. (You still want chunks, so fold it in or mix lightly.)
7. Toss blueberries in remaining flour.
8. Fold into batter. (with lemon rind if desired)
9. Pour into greased muffin top pan, filling each cup to the top rim.
10. Sprinkle topping over batter.
11. Bake at 350* for 15 min.
(It says to let cool for 30 min. Really? Ya, I ate these after like 10 ;)

ENJOY! :)

signature

Thursday, January 6, 2011

Fried Onion Rings

Fried Onion Rings
****
I LOVE Fried onion rings! MMMMM! This is my fav recipe. Its relatively easy (although you do have to add to oil one at a time or they clump) and they are delicious. If you reheat in the oven they even make good leftovers!

INGREDIENTS:
1/2 c. all-purpose flour
1/2 c. water
1 egg, lightly beaten
1 tsp. seasoned salt (we use way more for more flavor)
1/2 tsp. baking powder
1 large onion, very thinly sliced
oil for frying

DIRECTIONS:
1. In a shallow bowl, whisk the first 5 ingredients. Separate onion slices into rings. Dip rings into batter.
2. In a fryer, heat oil to 375*. Fry onion rings in batches for 1-1 1/2 min on each side or until golden brown. Drain on paper towels. Serve immediately.

**If you plan on reheating, store in fridge and then you must reheat in the oven (I use the broiler) or toaster oven or they will most likely just get soggy.**

ENJOY!!!


signature

Tuesday, January 4, 2011

Homemade Maple Syrup


Homemade Maple Syrup
****
After running out of syrup on a morning we were having waffles I found this quick recipe using just 4 ingredients and only takes 10 minutes to make! We don't buy syrup from the store anymore!

INGREDIENTS:
1 c. water
1 c. white sugar
1 c. brown sugar (2 c. if you like a thicker syrup)
1 Tbsp. maple flavored extract (the maple flavor is strong, you can use less if you don't like it)

DIRECTIONS:
1. Bring the water, and both sugars to a boil in a saucepan over medium high heat. Reduce heat to medium low and stir in the maple extract; simmer 3 min longer.

**1 c. of brown makes a pretty thin syrup, make it thicker by adding more brown, I use between 1 1/2 - 2 cups**
**The maple flavor is strong, I use a little less than a Tbsp of flavoring but we don't add very much syrup. If you like a lot of syrup, I'd cut back on the maple**

**As in all syrups, this gets STICKY! Make sure you store in a glass container**

Top on your waffles, pancakes or hootenanny!

ENJOY!

**This recipe was found on allrecipes.com submitted by "Lucynda"


signature

Fluffy Pancakes


Fluffy Pancakes
****
This is my go-to recipe for traditional pancakes. The vinegar in the milk is a homemade version of buttermilk and is what really makes these so light and fluffy! Top with butter & homemade syrup (I have one on here) or strawberries and whipped cream!

INGREDIENTS:
3/4 c milk
2 Tbsp. white vinegar
1 c. all-purpose flour
2 Tbsp. white sugar
1 tsp. baking powder
1/2 tsp. baking soda
1/2 tsp. salt
1 egg
2 Tbsp. butter, melted
cooking spray

DIRECTIONS:
1. Combine milk with vinegar in a medium bowl and set aside for 5 minutes to "sour".
2. Combine flour, sugar, baking powder, baking soda, and salt in large mixing bowl. Whisk egg and butter into "soured" milk. Pour the flour mixture into the wet ingredients and whisk until lumps are gone (don't over mix).
3. Heat a large skillet over medium heat and coat with cooking spray. Pour 1/4 cupfuls of batter onto skillet, and cook until bubbles appear on the surface. Flip with a spatula and cook until browned on the other side.

Serve with butter and syrup or strawberries and whipped cream. These freeze great! Just pop in toaster over for a quick breakfast!

ENJOY!

**This recipe found at allrecipes.com submitted by "kris"**

signature

Soft Sugar Cookies


Soft Sugar Cookies
*****
These are my favorite sugar cookies, because they come out soft (I LOVE soft) AND there's no rolling out the dough! So it's much faster than traditional. The sugar topping gives it a crunchy top, if you want you can also decorate with frosting instead.

INGREDIENTS:
2/3 c. shortening
2/3 c. butter
1 1/2 c. white sugar
2 eggs
2 tsp. vanilla extract
3 1/2 c. all-purpose flour
2 tsp. baking powder
1 tsp. salt
1/3 c. granulated sugar for decoration (Or frosting)

DIRECTIONS:
1. Preheat oven to 350*.
2. In a medium bowl, cream together the butter, shortening and sugar. Stir in eggs, vanilla, baking powder and salt. Stir flour into creamed mixture until dough comes together.
3. Roll dough into walnut sized balls (I use a scooper) and roll the balls in decoration sugar (I only dip the tops). Place them on an unprepared cookie sheet about 2 " apart.
4. Bake cookies 10-12 min. in preheated oven, until bottom is light brown. Remove from baking sheets to cool on wire racks.

ENJOY! :)

signature